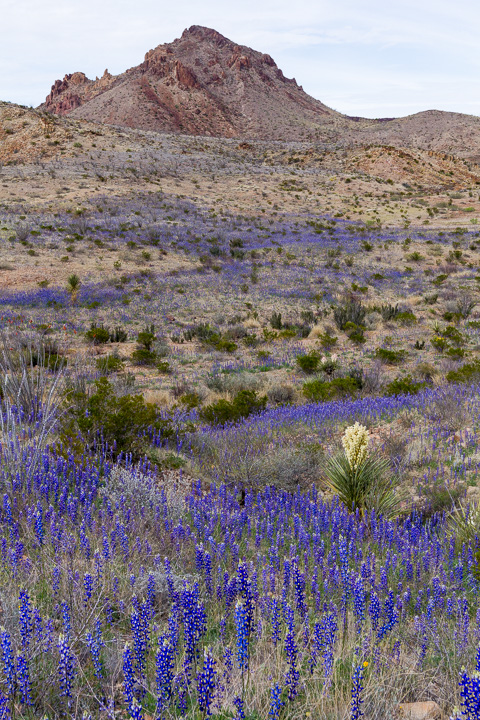
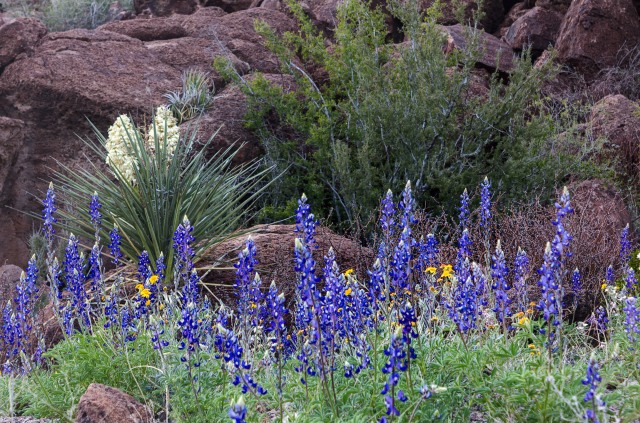
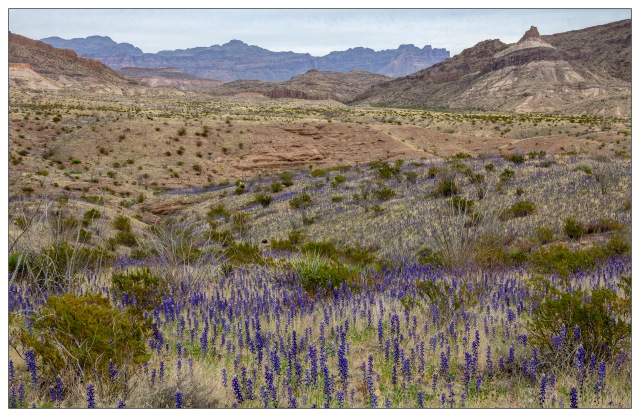
When Texans speak of spring wildflowers they usually mean Bluebonnets. And the only bluebonnet that grows abundantly here in the Trans-Pecos is the Chisos Bluebonnet, Lupinus havardii. This bluebonnet occupies a very narrow range along the corridor of the Rio Grande in the Big Bend. But here, it’s the champion bluebonnet and provides the majority of our spring color.
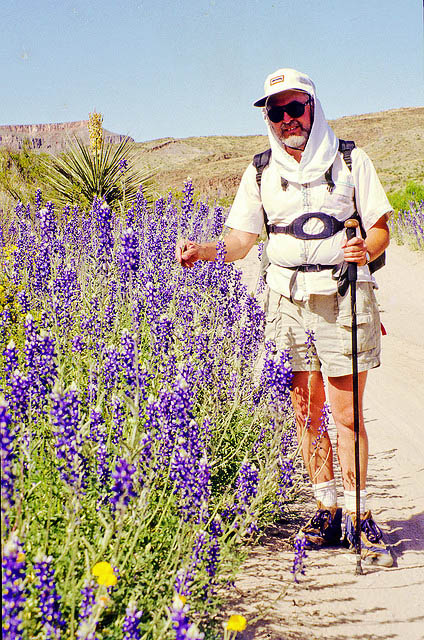
Lupinus havardii plants are the tallest of all bluebonnets. Here is a photo of me, taken in the 80s, standing next to a group of this species. As you can see, they are tall; sometimes three or four feet tall!
Lupinus havardii flowers are usually a deep blue/purple color. Now and then you may spot a white one, in which case it is your duty to tell all your friends just where you saw it. Visitors sometimes wear narrow paths from the road to an area where a white bluebonnet lives. Lupinus havardii has genes that enable it to create blue, yellow, red, and white. The deep blue/purple flower is the most common and the only color you’re likely to see unless you go hunting for different ones. But this year plants with different colors are occurring more frequently than usual, so I thought I’d share a few pictures of these varieties. I’ve not yet found a pink one, but I know they’re out there, and I’ll certainly keep looking.
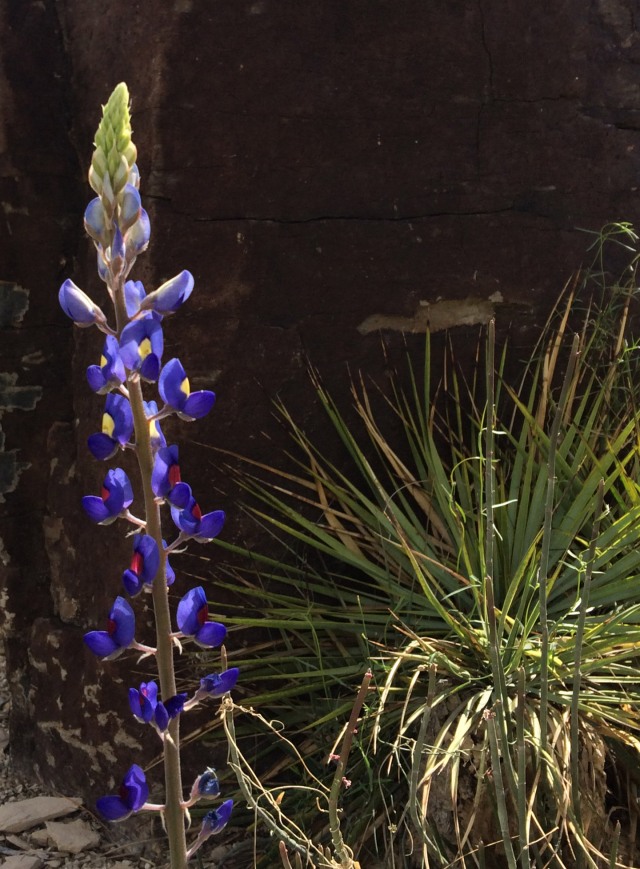
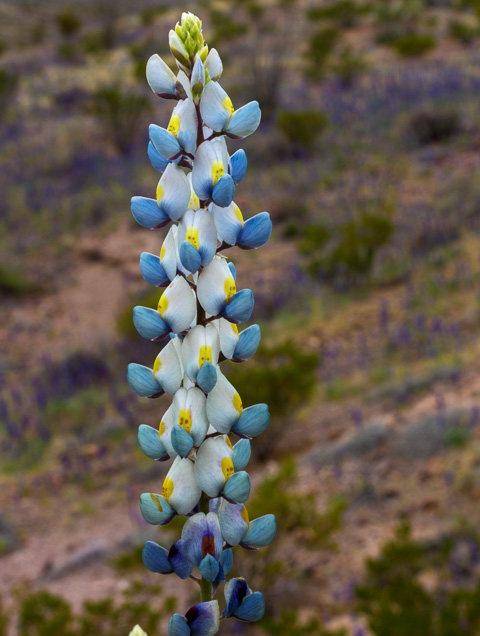
Here is your basic bluebonnet. The backlighting reveals the arrangement of pigments. The red and yellow patches are quite visible on this blossom.
And here is a stand of a lighter shade.
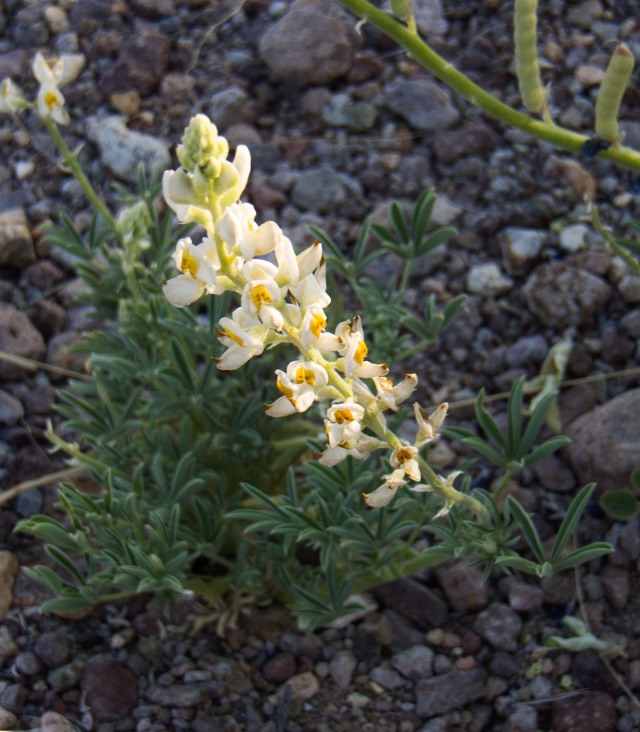
Here is the much less common white bluebonnet.
A stand of blue and white bluebonnets living in the same area.
Now and then, a plant sports multiple colors on a single raceme
I’ve heard that a single plant may create a multicolored raceme, and the usual deep blue racemes on different stalks, but that is another one I have not found yet.
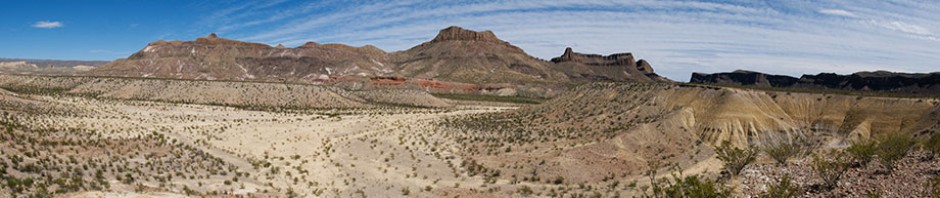
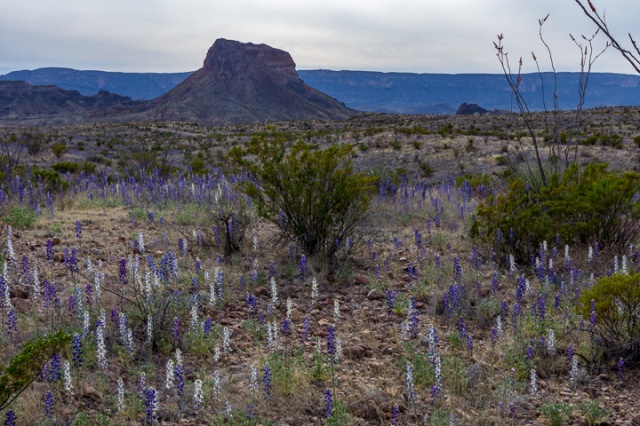
Here is a typical scene on the River Road in the national park.
I hope you can come out to see this bloom, but from what I understand, Central Texas is just as spectacular. Texas is a great place this time of year.
It has been said that in the Chihuahuan Desert, we don’t have soil. We have dirt. And if you’ve ever tried to grow things out here, you’re likely to agree with that assessment. But in fact, that is not true. Desert soils are often surprisingly complex.
These soils are common throughout the Southwest. You can usually recognize them by their appearance.
A Typical Bio Crust
These places look sort of “warty” and parts of them are black, or at least significantly darker then the surrounding ground. What you are looking at is an area covered with cryptogamic crust or what is more commonly described today as a biological soil crust.
What Is It?
Biological Soil Crusts are actually a complex community of several plant species, and its existence is vitally important to the ground beneath it. They are made up of an assemblage of species of cyanobacteria, lichens, fungi, green algae and (rarely) mosses.
Cyanobacteria
Cyanobacteria are single cell organisms That have all the machinery they need for photosynthesis. They don’t like living alone – instead they hook up with each other forming long strands – a little like pearls on a string. Every so often, an extra large cell appears, either attached to the strand or floating around by itself. These cells are called heterocytes.
Heterocytes are responsible for “fixing” nitrogen and making it available for plant use. We will talk more about these cells later. The following figure is a microscope image of many cyanobacteria cells. The heterocytes are the cells that look like empty balloons.
Heterocytes
Fungi and Lichen
If the algae and the fungi are compatible, the fungi may take in the bacteria, forming symbiotic organisms called lichen. In such an arrangement, fungi protect the bacteria and provide them with nutrients. In return, the bacteria produce food, nitrogen and carbon for the fungus.
As you can see, the organisms in a Biological Soil Crust organize themselves into ordered layers. The following figure illustrates a typical arrangement. You can also see how the filamentous layer is bound together by the tiny threads made by cyanobacteria.
Ordered Layers
Left alone these crusts can be remarkably stable and long lived. Their key to survival is their ability to tolerate extreme dehydration. Their water content can drop to 5% or less, a condition which terminates all metabolic processes. Nevertheless, during the rare moments when water is present, they awake, and take up living as if there had been no interruption at all. Their colonies are essential in providing stability and fertility to desert soils.
Where Do You See It?
Biological Soil Crusts prefer fine textured soils such as silt, clay, and fine sand. They prefer level or gentle slopes in open areas between plants. In the following picture, the light/almost white soil at the bottom of the frame is perfect habitat for Biological Soil Crusts.
Typical Scene with Bio Crusts
What Good Is It?
Biological Soil Crust both stabilize and fertilize the soil beneath them.
Stability
All crust organisms secrete polysaccharides into the soil. Polysaccharides are sticky and long-lasting. They help bind soil particles into aggregates. These aggregated areas increase soil aeration, water infiltration, and resistance to erosion. Desert soils are slow to form and are easily swept away. Biological soil crusts increase the soil’s resistance to erosion, and if undisturbed can protect soil surfaces almost completely. Plants growing in crusted soils generally have greater biomass and higher concentrations of nutrients than plants growing in uncrusted soils. Polysaccharides can bind and prevent loss of positively charged nutrients.
The following picture illustrates just how effective BSC’s are at controlling erosion. The area shown is about 8×12 inches; the gully on the left is about 6 to 8 inches deep. Even in this small time-period, the black Biological Soil Crust has prevented the loss of 6 inches of topsoil.
Protection Against Erosion
Enlarging the image to show only about 1 square inch of soil reveals the protective process in detail. This crust is left overhanging the gully.
Fertility
Biological Soil Crusts are major contributors to to the health of desert soils. Their two greatest contributions are “fixing” nitrogen and carbon from the atmosphere and converting them into forms that plants can use. This is important because lack of nitrogen is often as great a barrier to desert plant life as is the lack of water.
The Trouble with Nitrogen
Nitrogen is required for all forms of life. It is essential for the biosynthesis of molecules such as nucleotides, amino acids and proteins used to create all plants, animals, and other organisms. In the gaseous state, nitrogen occurs in molecules of two atoms, tightly bonded together in an arrangement that is extremely stable and virtually inert. In fact, Nitrogen’s bonds make it one of the tightest bonds in nature. Chemical processes that take the atoms apart are complex, energy intensive, and expensive.
But life has found a way. Cyanobacteria make and use an enzyme called nitrogenase that is capable of converting N2 (atmospheric nitrogen) to NH3 (ammonia). Ammonia is readily utilized by most terrestrial life forms. Biological Soil Crusts are an important source of nitrogen and carbon in deserts where vascular plant coverage is sparse. Cyanobacterial crusts can fix up to 1 kilogram per hectare per year; lichenized crusts can fix up to 10 kg per hectare per year. This makes them the dominant source of these nutrients.
Chelators
Vascular plants need many nutrients to thrive. Macronutrients such as hydrogen, oxygen, nitrogen, phosphorus, potassium, calcium, magnesium, and sulfur are needed along with trace elements such as boron, chlorine, manganese, iron, zinc, copper, and molybdenum. As in the case of nitrogen most of these elements, even if present in the environment, are said to be unavailable to the plant because they are already bound to other molecules in the soil. But biological soil crusts create “chelators,” small molecules that bind very tightly to metal ions.
The chelating process secures the desired ions in a sort of organic structural cage that renders them electrically neutral and chemically inert. Plants can break into these cages to get at the goodies inside.
Nitrogenase
A Soil that Traps Dust
The increased surface roughness and the presence of so many polysaccharide sheaths increases the capture of nutrient rich dust. Incoming dust may originate almost anywhere in the world, and it can often increase the concentration of essential nutrients such as potassium, phosphorous and bioavailable nitrogen up to fourfold.
Studies show that soil crusts reduce or completely eliminate erosion of soil by water and wind. Biological soil crusts also trap soil moisture, and provide sheltered areas for plants to germinate and grow.
Fragility
Though Biological Soil Crusts can live for literally thousands of years they have one significant weakness – they are physically fragile. If you step on an area of crust, that area dies. Possibly the greatest threat to to Biological Soil Crusts is mechanical disturbance from vehicle traffic and grazing. Loss of these crusts has led to massive invasions of cheat grass throughout the Southwest. The grass makes wildfires more likely and more intense when they happen. Biological Soil Crusts can be killed in very hot fires.
Biological Soil Crusts can recover from mishaps, but the recovery can take decades to millennia, and attempts to artificially restore them have been largely unsuccessful. Currently the only practical way of protecting these delicate assets is to protect them from the physical hazards that destroy them. Removing vehicles and cattle is the best protection we know of to date.
Visitors to parks, preserves, etc should be advised of the value and fragility of these soils so that they can take steps to avoid treading on them. When you visit these areas please try to remember this advise.
When you’re taking pictures you may see, in your mind’s eye anyway, the scene as a stunning black and white image. You know that is how it will be printed, so how do you make the picture?
Some cameras will have a setting/button/mode etc., that instructs the camera to produce black and white images, and what you will get is a 16-bit grayscale image. For many applications that will be fine. But if you start with a distinct personal vision of the image, you will often find the result to be disappointing, and almost impossible to change.
Besides the fact that you probably don’t know where the stupid setting is in the first place, and you don’t want to spend time finding out, the in-camera B&W image is produced in the camera’s computer using an algorithm – usually it’s a simple desaturation. Desaturation consists of interpreting each of three colors in the sensor image as a grayscale, and combining them according to some averaging technique. The output is a single channel grayscale image; two-thirds of the image data your camera captured in the first place is gone and cannot be recovered. Worse, it is unlikely that the image looks like what you imagined in the first place. You can do much better in Photoshop.
By capturing the image in color and processing in Photoshop, you can control the tonality of an image in many different ways to achieve results more in line with what you’d imagined in the first place.
I can think of several ways you can convert a color image to b&w in Photoshop. Each method offers different controls, and creates a distinct style of output.
Lets start with the simplest.
Desaturation
Your camera uses some variant of desaturation to produce monochrome output. You can do that in Photoshop as well. Image → Adjustments → Desaturate will do it. Here is the resulting image.
As you can see, the converted image is somewhat muddy; looking at you could not tell that the season was fall and the Cottonwoods a clear yellow. Also, the light-colored soils don’t show up that way and the sky is a bit anemic. We can do better.
Channel Mixer
The Channel Mixer is one of the oldest processes in Photoshop that you can use to do this conversion. Its default conversion process is pretty good and you can control what percentage each of the red/green/blue channels contribute to the finished conversion. It also has several presets that produce good images. I have used the red preset many times in the past.
In the default conversion, the result is somewhat better. Noticeably, the yellow trees in the creek are rendered in a slightly lighter tone and look a little more realistic. Also, the sky is a bit more lively.
Although a great deal of control is possible with the channel mixer, it has one major drawback – it requires you to think and work in the additive RGB color space. Very few people find this to be a very comfortable way to work. For example, in RGB, Yellow is an equal mixture of Red and Green. To control the brightness of yellow objects you must manipulate the Red and Green channels together, and in lockstep. Not very intuitive.
Black and White Adjustment Layer
The Black and White Adjustment tool does not appear in your Adjustments Palette as you might expect but is implemented as a special type of Layer. Use Layer → New Adjustment Layer → Black and White to invoke it. This adjustment layer is a marked improvement over the Channel Mixer layer. It allows you to adjust the brightness of 6 different colors (as opposed to the three colors available in the channel mixer), and has 12 different presets. If you like you can choose a preset that looks close to what you had in mind and then tweak the tones to your liking. Also, the default conversion is slightly better than the Channel Mixer’s.
If the adjustment icon does not appear on your copy of photoshop use the
Windows → Adjustments command to bring up the palette.
Here is the default conversion.
In this conversion different tones are acceptably separated.
Because this tool allows you to adjust the brightness of colors as you see them it is much easier for photographers to use. In the following image I used the B&W Layer Adjustment: I increased the relative brightness of Yellow to bring out the trees, and I decreased Blue to make the sky more dramatic.
As you can see, the trees now stand out like they did in the color image, and the sky is much more dramatic. (I’ve exaggerated the changes to make them more visible on your screen.)
Gradient Mask
The Gradient Mask might seem like an odd way to convert images to black and white. It is usually used to add color to black and white images. But it works and does an excellent job at that. To use it click the Black and White icon in your Adjustments palette.
Choose the Foreground-to-Background gradient if it appears in the presets, or simply define the gradient yourself. You should have a gradient bar that starts black and fades to white on the right.
Adding the gradient to a color image instantly converts it to black & white.
As you can see, this conversion is very good, right out of the box. It’s only drawback is that once done, it’s done. You can change the gradient in the gradient editor, but doing so requires that you think in computer software terms rather than human ones.
Black and White Adjustment Plus Gradient Map
By combining a Black and White Adjustment layer with the Gradient Mask adjustment, you can have the best of both worlds. Do the Black and White Adjustment first. Then add the Black and White Gradient Mask layer above it. Here are the default results.
In this result, the contrast is improved without reducing mid-tone separation. By using these two adjustments together you gain a huge amount of control over the final product, control that is both easy to use and powerful.
I used these two tools together for the final image. Starting from the default, I made three small changes: (1) I brightened yellow a bit to bring out the fall color of the trees. (2) I darkened the blues slightly to make the sky more dramatic. (3) Finally I moved the mid-point of the gradient slightly to the dark side to brighten the image a bit. Here is the result.
Now this is what I had in mind when I started! The result, as you can see, is a huge improvement over simply desaturating the image, and takes very little effort to implement.
I hope you find this a useful addition to your bag-o-tricks for Photoshop editing.
I’m just trying to get the word out … the Big Bend Ranch State Park closed today. All campsites are closing (even back-country permits), no permits of any kind issued. Day use is still permitted.
Coming up — all hotels, motels, Air B&B’s are being closed. All visitors are being asked to leave.
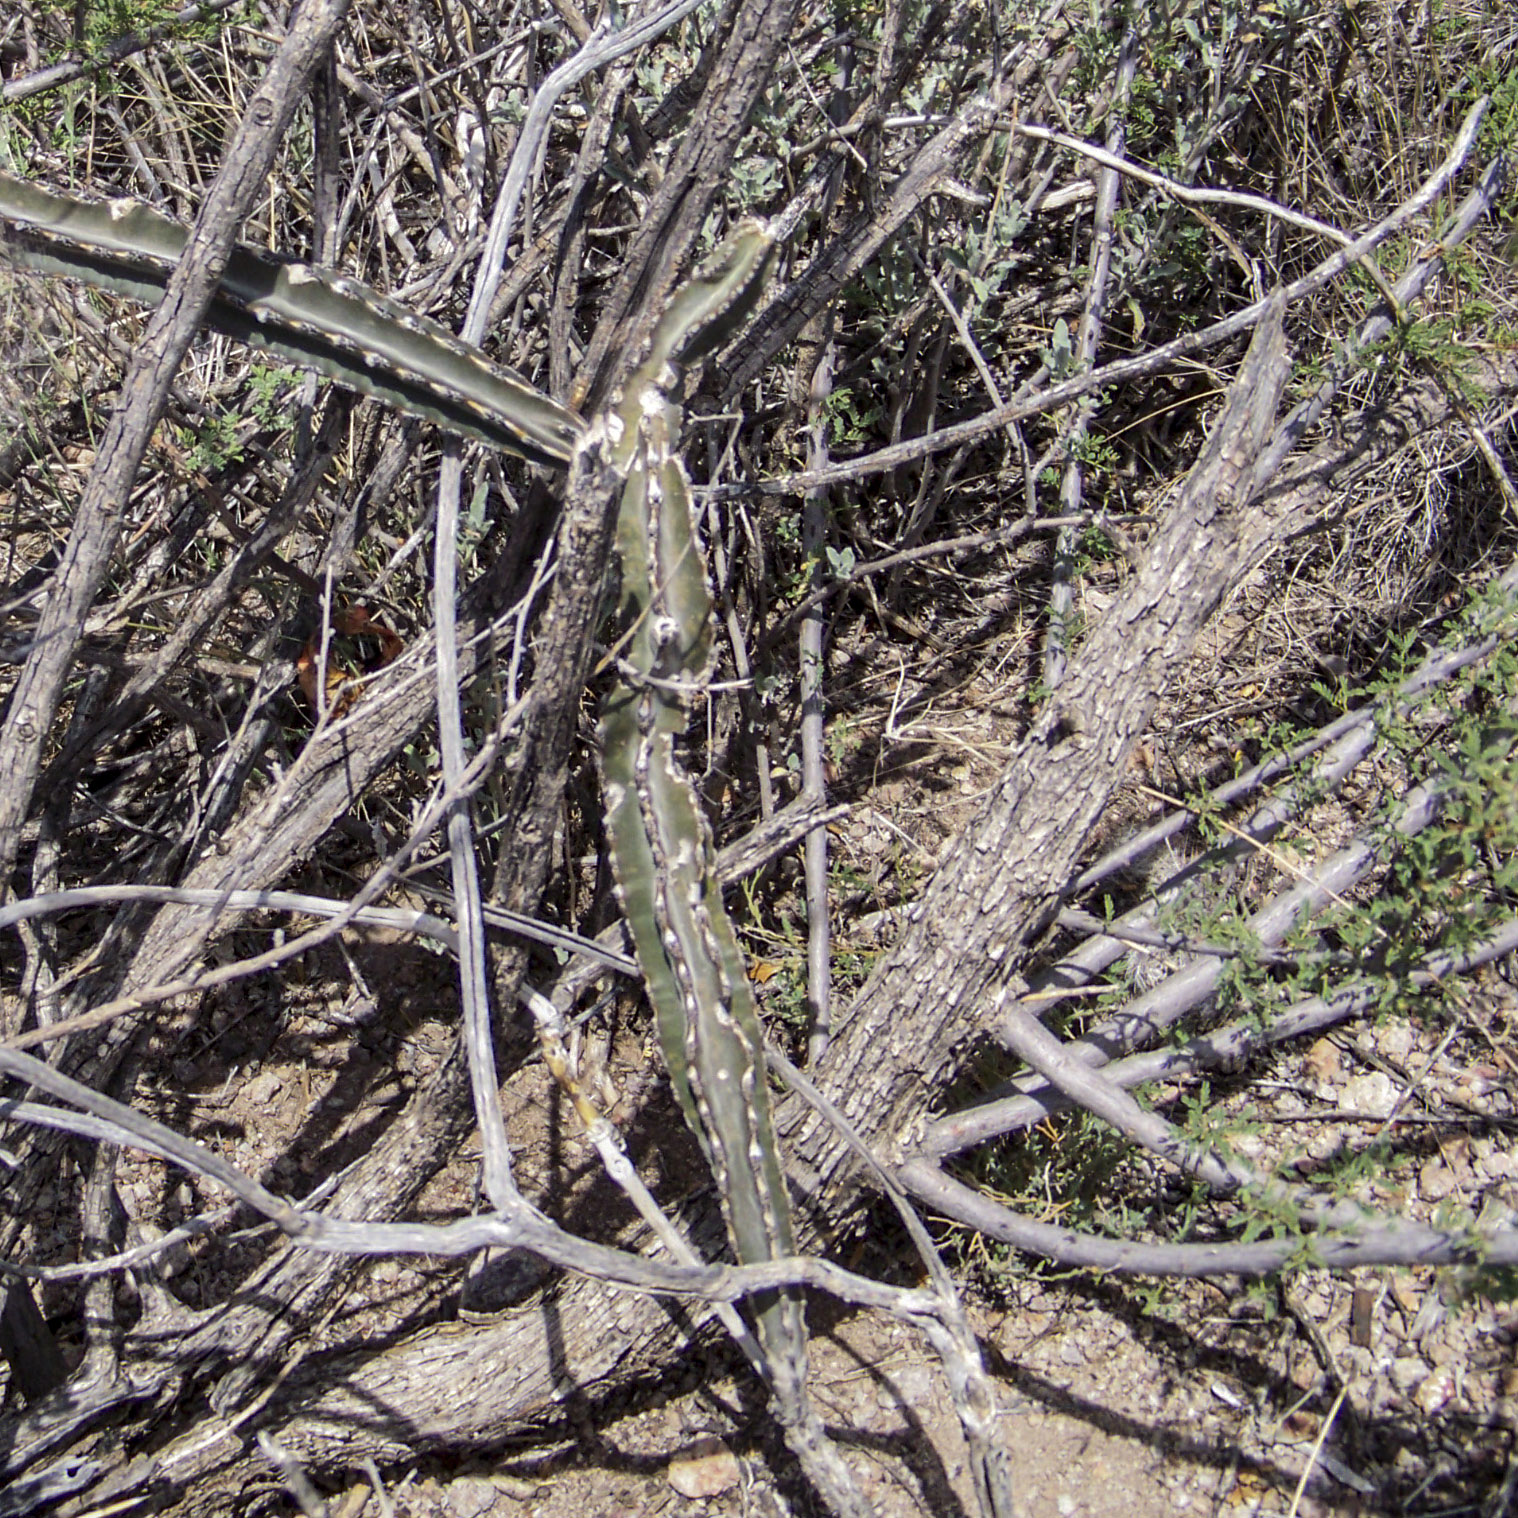
This sprawling, stick-like plant cannot stand upright on its own, so it uses the stems of other plants, such as Creosote, for support. In the wild, the dull gray-green stems look like dead sticks and go largely unnoticed even by cactus lovers. The following photograph gives you an idea of just how hard-to-find this cactus can be.
The bulk of the plant is even harder to see – impossible in normal circumstances – it consists of a large underground tuber which may weigh 70 pounds or more. I saw one of these tubers at a cactus show that was the size of a small watermelon.
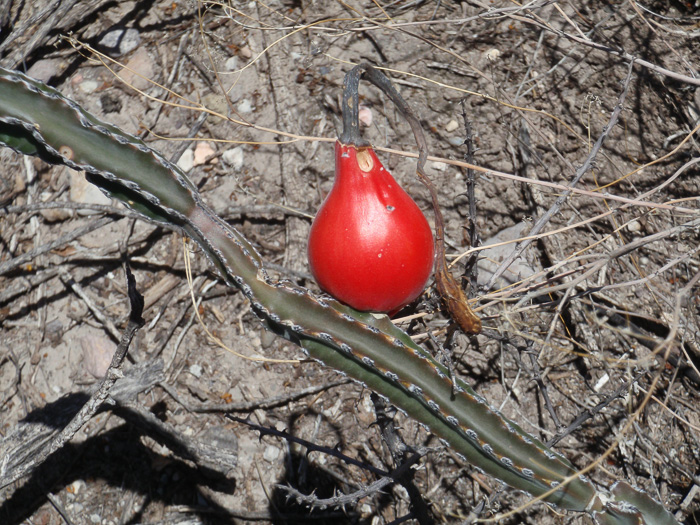
Fortunately, our Queen of the Night is not that difficult to find during the month or so after blooming, for, in cactus terms, the fruit is enormous. At its smallest, the brilliant red fruit is larger than a loquat, and large ones look like small, red pears.
But it is the flower that matters to most of us. Growing laterally from last year’s areoles, these spectacular blossoms open at dusk and close at sunrise. Miss seeing one that night and you will have to wait a year to try again.
Reaching 3 inches in diameter, the white blossoms fill the air with a heady fragrance which does not go unnoticed by its nocturnal neighbors. If you are watching on a moonlit night, you will see moths coming to feed, and where there are moths, there are bats. Spending an evening with one of these blooming beauties is a night you will never forget.
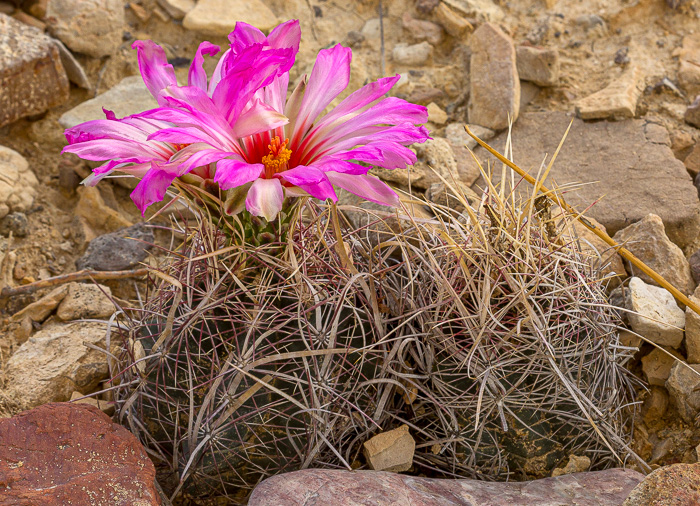
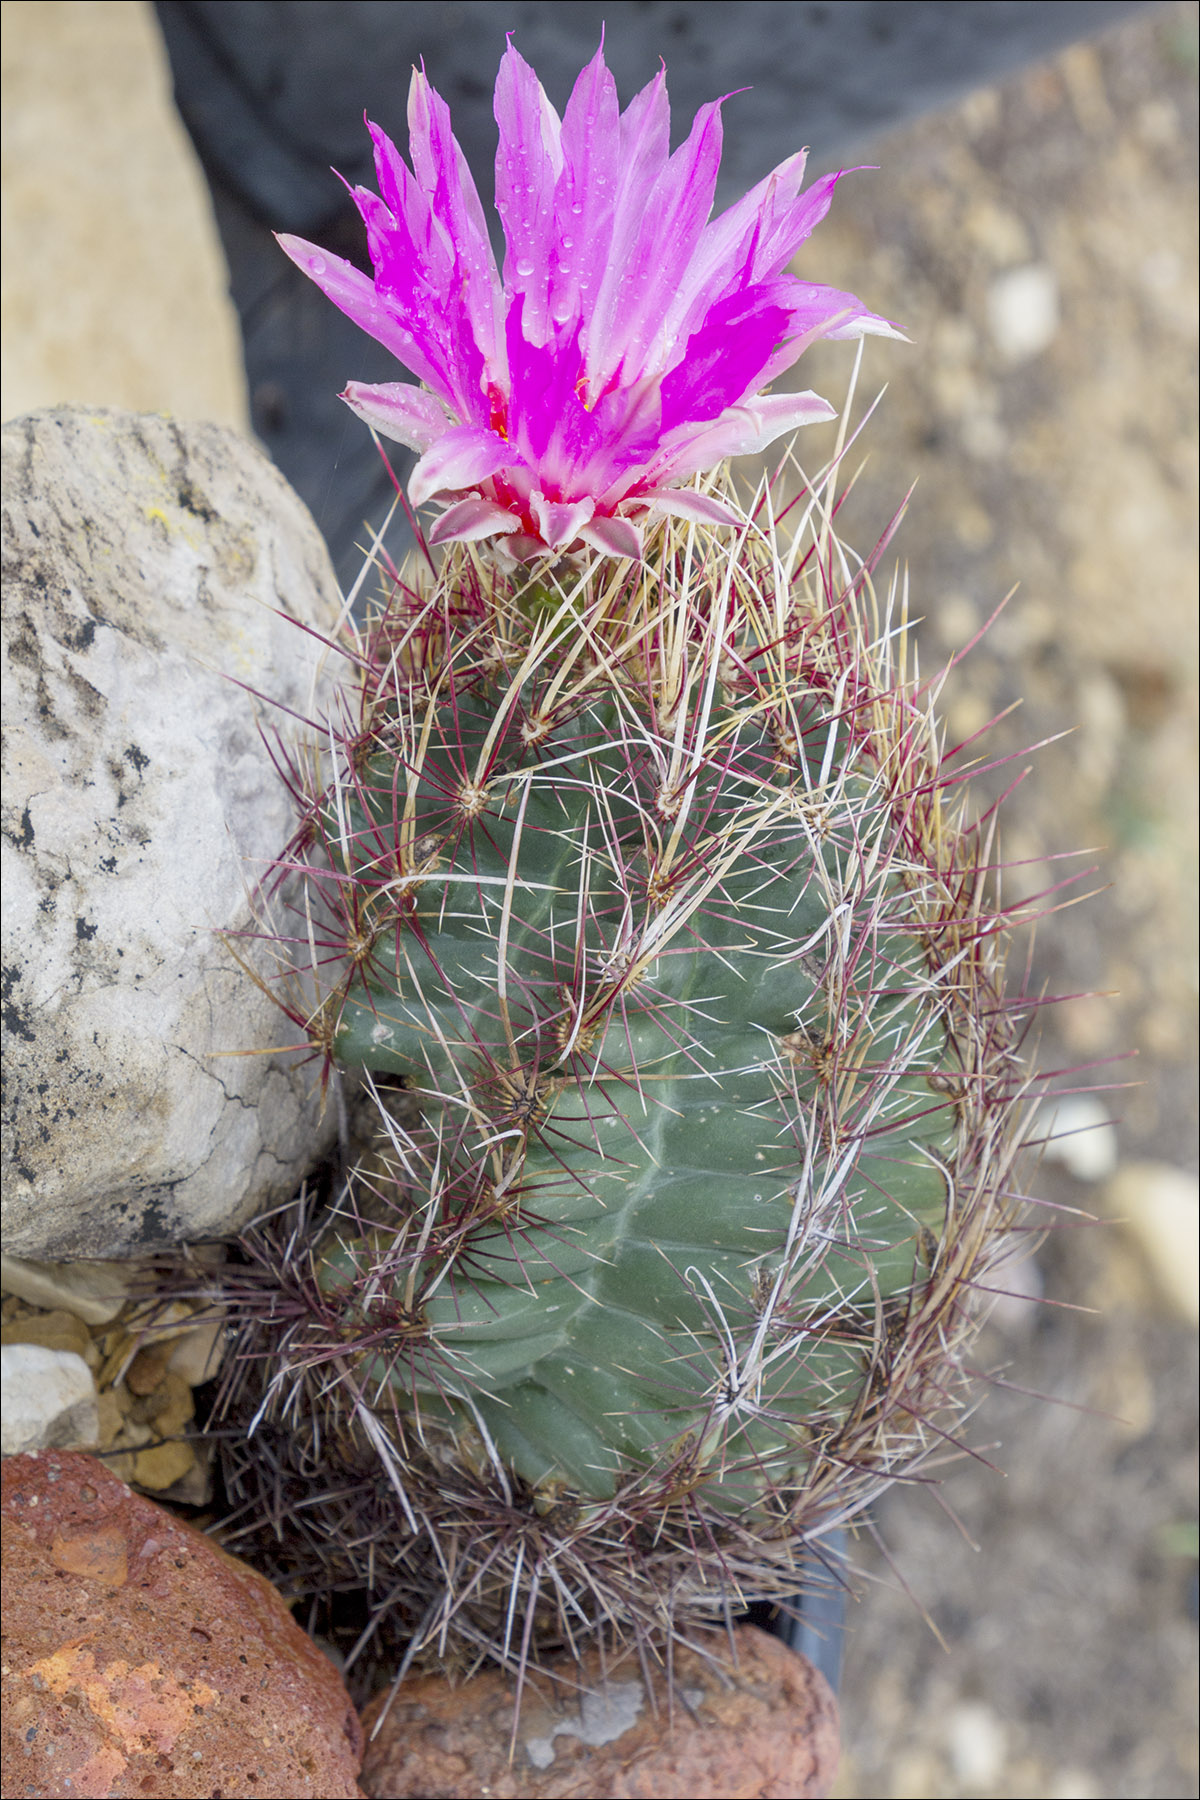
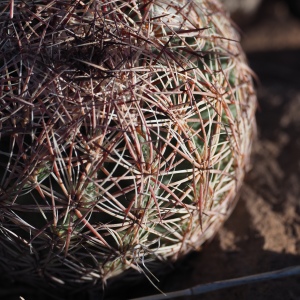
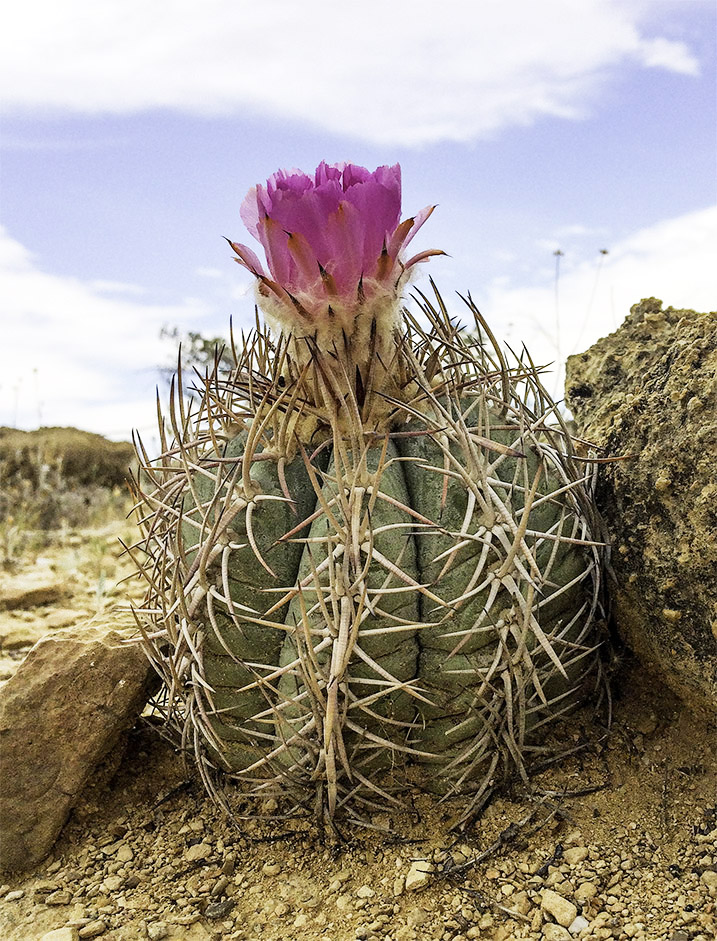
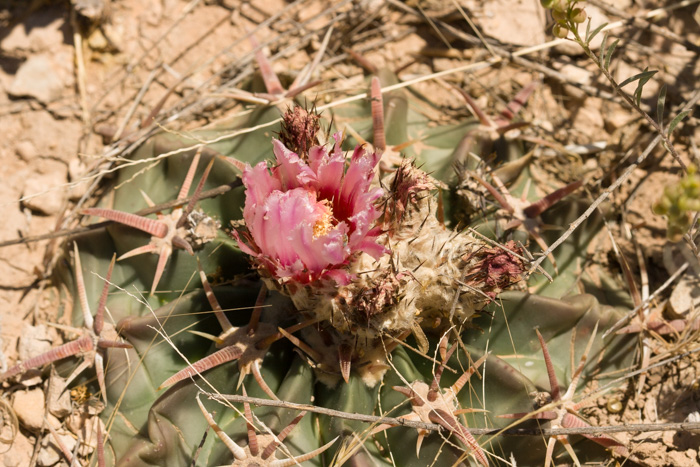
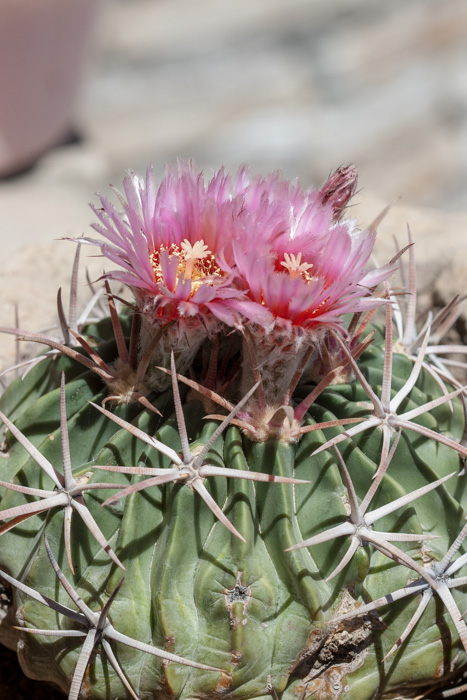
The Glory of Texas cactus is another species that is the only one in its genus living in the Trans-Pecos. It is widely regarded as having the most beautiful blossom of all the cacti in Texas, a view with which it would be difficult to argue. Standing 3 to 7 inches tall, and growing to slightly 4 inches in diameter, this plant is easy to see, even when not in bloom.
No other Texas cactus has spine characteristics like this one. The upper third of the stem sports spines that look something like wood shavings. These spines are flattened and grow from 2 to 5 inches long. The central and some radial spines are bi- or even tri-colored. The pinkish to reddish color covers the middle of the spine. The remaining parts are straw-colored.
This cactus is ribbed. Ribs may be straight or spiraled and number 8–13. They look to have been made by fusing tubercles together. In older plants and with good rains, the ribs are spread apart, and it becomes easier to see the plant’s spines.
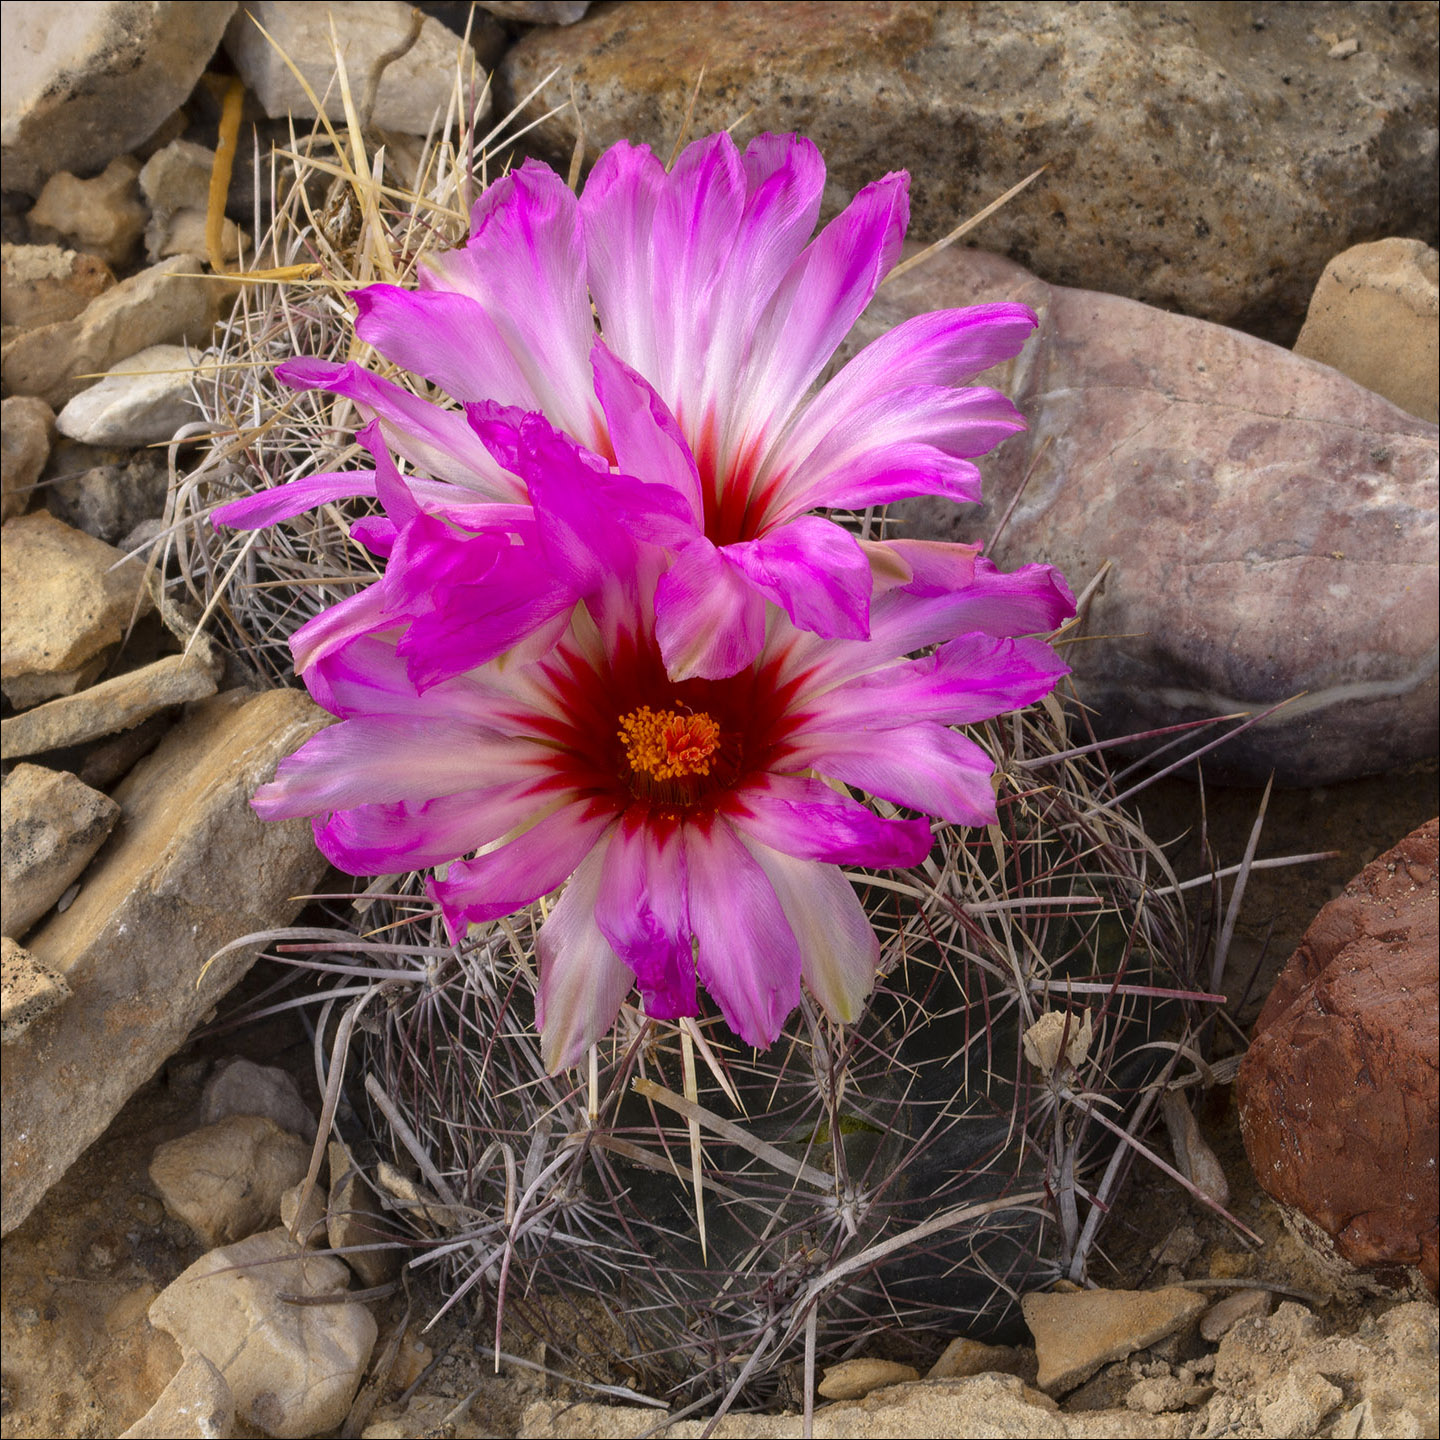
Flowers can be expected to occur between March and September, particularly after rains. The blossoms are between 2 and 5 inches in height and diameter. Tepals are reflexed with more pigment at the distal end of each tepal than at the center. They are a brilliant magenta; anthers are yellow with red-to-yellow stigma lobes. Flowers open mid-morning and remain open until afternoon, closing at night. They may reopen the next day, but that does not always occur.
Fruits are roughly ovoid, ¾ inch long at their largest. Fringed scales cover the fruit which dries out rapidly after reaching maturity.
Glory of Texas cacti are uncommon throughout their range, a situation made more acute by the fact that they are highly prized among collectors and are heavily harvested for the illegal cactus trade.
The plants prefer silty to gravelly soils on level ground. They are particularly abundant on the Boquillas limestone formations that characterize so much of the basin terrains in the Big Bend area. It can be difficult to find one in bloom because of the short blooming period for each blossom. When one is in bloom, it would be hard to miss.
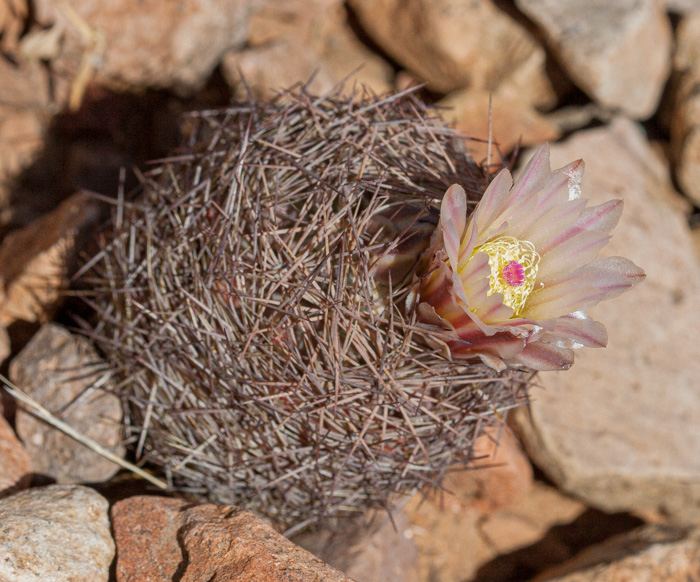
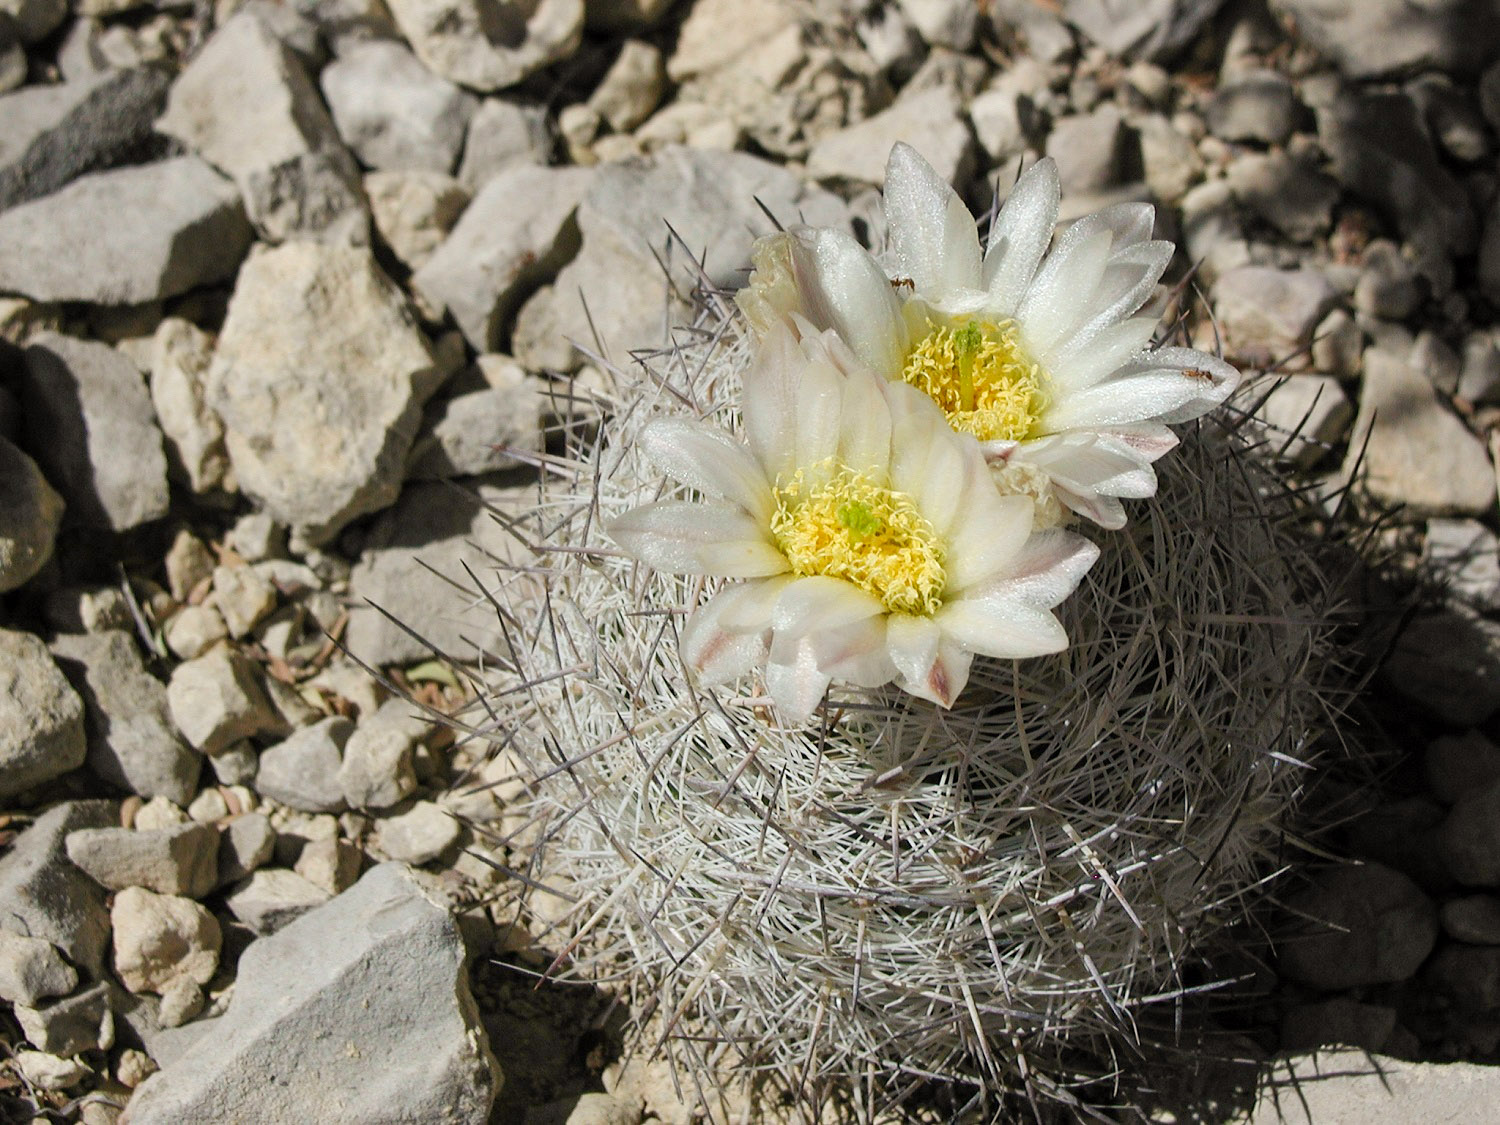
These cacti are short, elongated globular, and almost completely covered by spines. Areoles are each on distinctive tubercles that are arranged in rows. They bloom from February to mid-March, opening shortly afternoon and remaining open until dusk. They re-open each day for the next 3–4 days. There are often extrafloral nectaries, but they are hidden by the plant’s spines.
Woven-Spine Cactus (Echinomastus intertextus)
This cactus is variable in almost every aspect of its life. Usually the spines do not completely obscure the stem, but not always. The dozen or more radial spines are closely appressed, forming a flat disc. There is usually but 1 central spine, porrect, slightly downward pointing and much shorter than the radials.
Flowers are mostly white with cream-colored anthers. Style are red. This is the only Pineapple Cactus with red style.
Warnock’s Cactus (Echinomastus warnockii)
This is the most common Echinomastus cactus in the Big Bend area. Usually less than 3 inches tall, it can grow to 8 inches in some places along the river. The 11–15 radial spines grow in divergent directions unlike the flat disc-like growth of the Woven-Spine Cactus. Adults produce one central spine, porrect or an upward pointing spine.
Tan to straw-colored radial spines are gray at the base and chalky blue at the tips or on the entire spine. Central spines are the same color as the radials but blue-gray for half of their length.
Flowers are similar to others in the genus. They are white with bright yellow anthers. Style and stigma lobes are green. This combination of flower colors is diagnostic.
Fruits are light green and remain on the plant after ripening.
Mariposa Cactus (Echinomastus mariposensis)
The Mariposa Cactus grows around Lajitas and in the eastern part of the national park. Though listed as threatened, it is widespread and abundant in its range. It does well on thin Boquillas limestone and on rocky stable substrates.
Mariposa Cactus grows from golf ball to tennis ball size. Its areoles produce 25–32 overlapping ashy white radial spines. Commonly, 4 central spines, heavier than the radial spines, grow – 3 face down and 1 faces up. Typically their tips are darker than the rest of the spine. If the color covers the base of spines the plant doesn’t look so white.
This small genus contains only 2–4 species, two of which live in the Trans-Pecos. Both are small, globose plants ranging from ½–1½ inches in diameter. Both contain toxins that protect them from being eaten.
Common Button Cactus (Epithelantha micromeris)
The Common Button Cactus prefers rocky places at 1,500–5,600 feet elevation. It is a fuzzy white ball with 20–40 slender, straight, slightly overlooking spines per areole. It blooms from February to April.
The flowers of this plant are the smallest of any cactus species in the Trans-Pecos. They are tiny and pinkish with red to brownish midstripes, usually quite distinct. Filaments are red to yellow, anthers pink to creamy yellow and stigmas white. The spines on the apex may have dark tips.
The fruits are small, red, and shaped like little clubs.
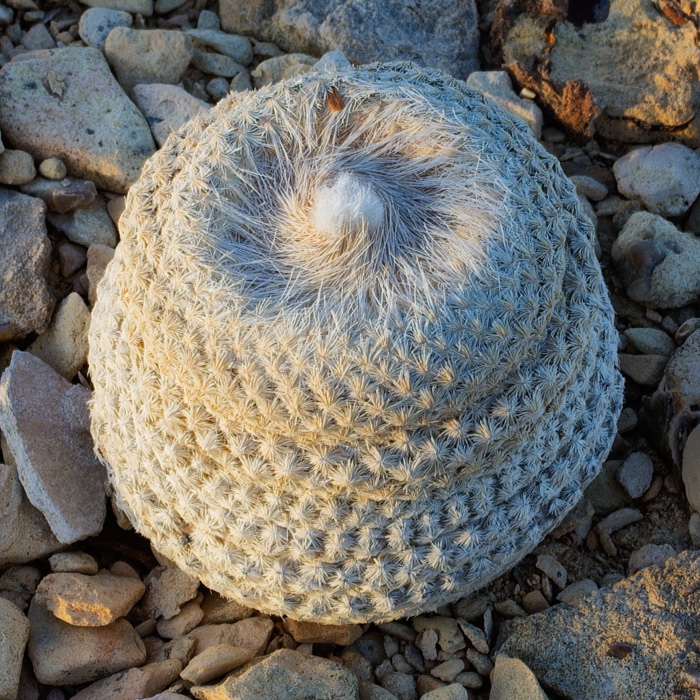
Boke’s Button Cactus (Epithelantha bokei)
The Common Button Cactus is usually pretty spherical. But Boke’s Button Cactus usually has a flat top. Boke’s areoles grow 30–50 radial spines. And while the Common Button Cactus’ spines are roughly overlapping, Boke’s are all appressed with little overlap.
Boke’s Button Cactus blooms between May and June. They flowers are white to very pale pink; sometimes the tepals will have pink to middle green midstripes. All other parts are similarly pale and variable.
Overall Appearance
Though the two plants are similar, it easy to tell the difference if you can see them side by side. Boke’s Button Cactus looks, and feels smooth – no errant central spines arise from the surface to give the plant a prickly feel. The Common Button Cactus spines are fewer and less organized than Boke’s, and the elevated spines give this plant a slightly more prickly feel.
Another difference lies in the way the two plants deal with drought. The Common Button Cactus simply shrinks when dry, but Boke’s Button Cactus starts shrinking at the top. Later, when rains arrive, the Common Button Cactus swells and appears to “grow” bigger whereas Boke’s Button Cactus resumes growth but does not expand the drought ring. This leaves bands of the plant that are slightly smaller than the rest. It can look almost like frozen custard without the cone.
I photographed this plant on a hill just east of the Big Bend Ranch State Park.
Four species of Echinocactus live in the Chihuahuan Desert, only two of which appear in the Trans-Pecos – the Eagle-Claw Cactus (Echinocactus horizontalonius) and Horse-Crippler (Echinocactus texensis).
You can easily recognize them on sight.
Eagle-Claw Cactus (Echinocactus horizontalonius)
The Eagle-Claw or Turk’s Head cactus is common throughout the Big Bend region. It grows on any soil, including soils high in gypsum. Eight ribs support widely spaced areoles producing 1–3 lower central spines, predominately cross-ribbed, plus 2 upper-central spines that are much smaller. Five radial spines typically curve down towards the cactus’ body. Areoles are widely spaced, and the cactus’ flesh is plainly visible though that condition does not seem to attract many herbivores.
Dense wool-like trichomes cover the stem apex; the trichomes shrink as they age, but they are annually renewed just before blooming. The flowers are magenta or bright rose-pink. Flowers may appear between April and June; after rains between July and September, the plant may bloom again
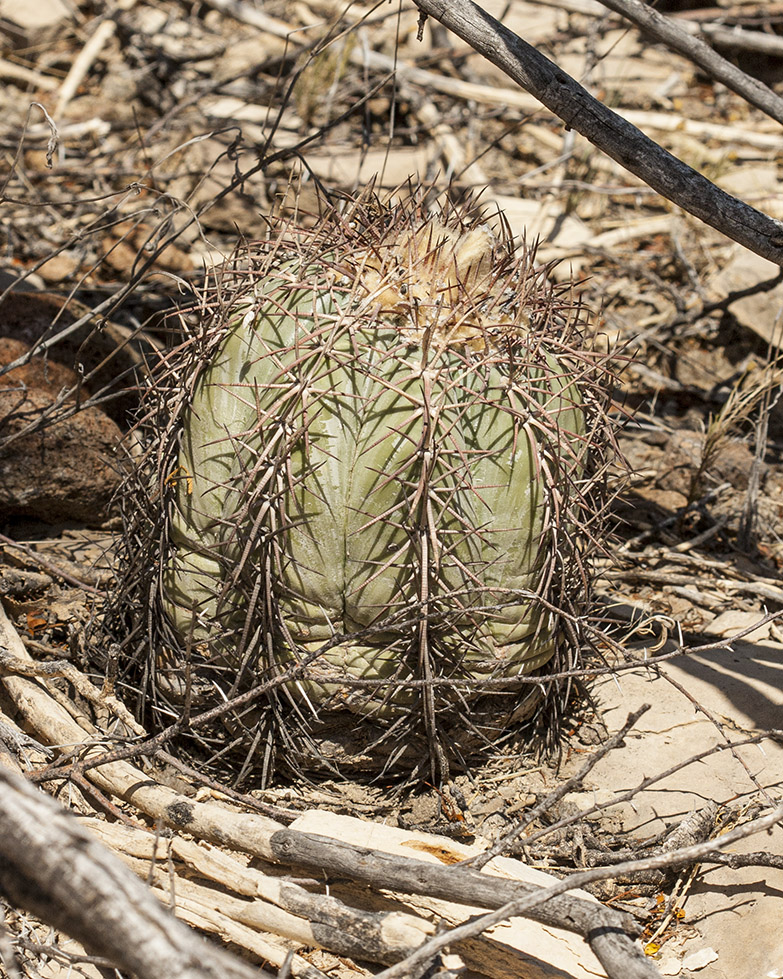
Horse Crippler (Echinocactus texensis)
Horse cripplers live in the eastern part of Brewster County, extending east beyond the Pecos River and north beyond the Trans-Pecos. They are uncommon-to-absent in most of the Big Bend, but appear briefly in the state park.
Horse Cripplers grow singly. The stem is severely depressed and may withdraw to below ground level when dry. However, with good rains, the stem may swell to a few inches in height. Mature plants always have 13–27 ribs with sharp crests. White wooly trichomes cover the apex. Each areole has one central spine and usually 6 or 7 radials. The central spine can grow to 2 inches long and have a fierce appearance.
Here is a photo that shows how depressed the stem can be.
[Img: IMG_1252
And here is one after some good rains.
This cactus blooms in April and May, opening in late morning and remaining open until late at night. The blossoms are smaller and paler than those of the Eagle Claw. Small mammals enjoy dining on the flowers, so finding one in pristine condition can be a challenge.
Fruits are bright scarlet maturing at ½ to 1 inch. Mature fruits can persist on the plant for months, but animals have usually eaten then before long.
The plant is exceedingly tough. You, and even your horse can step on it without harming the plant. However, the spines are tough enough to pierce just about anything that steps on them.